After my Asus N66U kicked the bucket, I considered a few options: another all-in-one router, upgrade to something like an EdgeRouter, or brew something custom. When I read the Ars Technica article espousing the virtues of building your own router, that pretty much settled it: DIY it is.
I’ve got somewhat of a psychological complex when it comes to rolling my own over-engineered solutions, but I did set some general goals: the end result should be cheap, low-power, well-supported by Linux, and extensible. Incidentally, ARM boards fit many of these requirements, and some like the Raspberry Pi have stirred up so much community activity that there’s great support for the ARM platform, even though it may feel foreign from x86.
I’ve managed to cobble together a device that is not only dirt cheap for what it does, but is extremely capable in its own right. If you have any interest in building your own home router, I’ll demonstrate here that doing so is not only feasible, but relatively easy to do and offers a huge amount of utility - from traffic shaping, to netflow monitoring, to dynamic DNS.
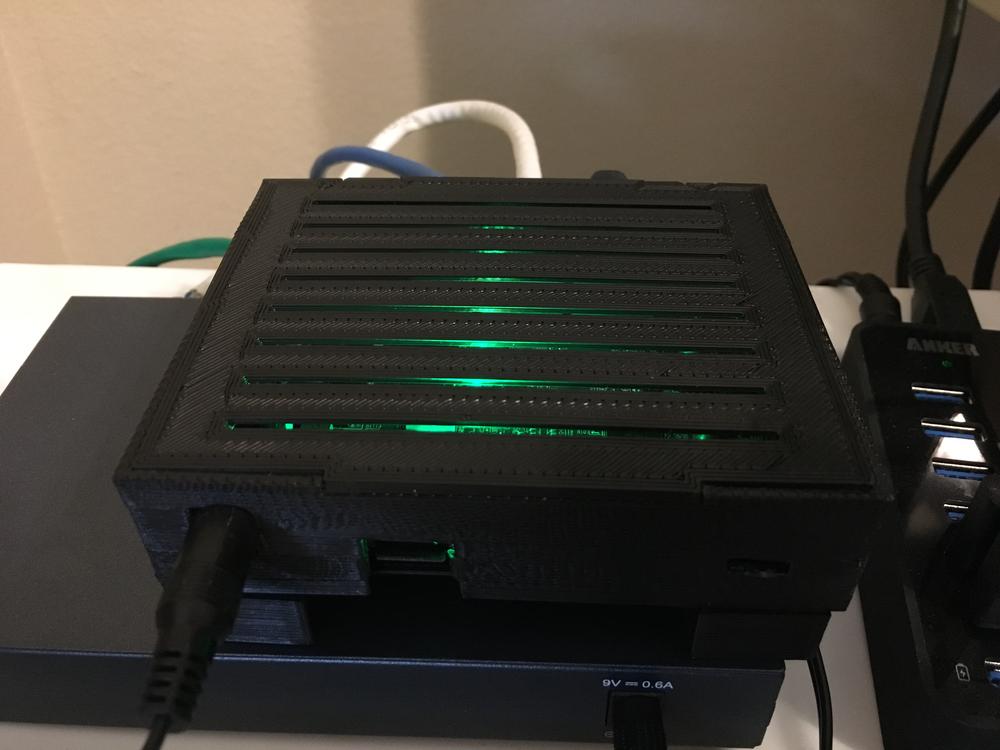
I built it using the espressobin, Arch Linux Arm, and Shorewall.
That picture shows the board enclosed in a 3d-printed case. Unfortunately, the espressobin isn’t popular enough to boast a wide variety of purchasable cases as the Raspberry Pi has, but there are some good models out there for 3d printing.
As a side note, the following documentation isn’t meant as a comprehensive step-by-step guide to doing the same thing yourself. Although I do want to cover many of the choices that went into the build, configuring something as important as a router/firewall really shouldn’t be a copy/paste job and would better be loosely guided by the steps here with a thorough understanding of how and why.
There are plenty of solid routers out there you can buy that aren’t stock ISP tire fires and would probably be more than suitable (I’m looking at you lovingly, EdgeRouter Lite). So why bother with all of this? There are some legitimate benefits here:
Technically you could put together a router using any computer with two NICs, but we can do equally well with less power, a smaller form factor, and more affordably. ARM boards hit the sweet spot: they’re super cheap, more powerful than you’d think, and well-supported with so many variants on the market.
The most well-known contender is the Raspberry Pi, but without two NICs or gigabit networking, it’s not a good option. Plus, you’re paying for things like a GPU that aren’t necessary in a headless network device.
The good news is that last year, the espressobin was released, and it’s super capable. It feels purpose-built for this type of thing: gigabit networking, a built-in switch, and no frills that you’d otherwise need for something more general-purpose (there isn’t even a display out, just a serial console).
Although the board is fairly young, both Armbian and Arch Linux Arm support the hardware, and both projects do a great job of it. If you haven’t explored the world of Linux on ARM, there’s not a whole lot to fear here. Armbian and Arch Linux Arm provide everything you need for aarch64 natively in the distribution repos, so there’s little that you’ll run into that feels foreign on a 64-bit ARM chip, and it certain feels worth it when you factor in the affordability of the hardware and low power footprint.
Here are some of the highlights for me:
I’ll make a small note here that I attempted to use the espressobin as a wireless access point as well. The board has a mini PCIe slot well-suited for a wireless card, and although it should have worked, I can definitively report that it’s not a good idea.
Without going into painful detail, there’s a slew of problems that don’t make it worth the effort. I could not get 5Ghz bands working under any scenario, my 2.4Ghz hostapd service became unresponsive every twelve hours or so, and speeds were shockingly bad.
In general, I think this is a failing of the espressobin hardware. Cards that should otherwise be well-supported in Linux (some of the cards I tested were ath9k or ath10k-based) simply don’t work with the board’s mPCIe interface. Even the officially-recommended cards had problems - the RTL8191SE would work intermittently, and even the card produced by Globalscaledoesn’t work as advertised. Incidentally, if you find a well-supported card on the espressobin, please do drop a reply on the related forum thread I started to discuss this issue.
With all that being said, my intent at this outset of this project was to separate my AP from my router, whether I ended up using an espressobin or not. Keeping the tasks of firewalling/routing apart from wireless is a nice separation of concerns, and you can get very good dedicated AP devices without any function outside of broadcasting a signal to keep it simple and powerful.
For what it’s worth, I ended up purchasing a Ubiquity UniFi device and have been totally happy with it.
There are two big choices here: OS and firewalling software.
The first choice to make is whether you want to hand-roll this from an distribution that supports aarch64 or use a prebuilt firmware-like solution such as OpenWRT. Personally, I’ve found that whenever I use a shrink-wrapped solution like Tomato/OpenWrt or FreeNAS for a build, I usually get frustrated without being able to really get in there and tweak things, so I’ll be using a general-purpose Linux distribution for the operating system.
As I mentioned previously, Armbian and Arch Linux ARM support the board, and espressobin has official documentation for Ubuntu (as well as Yocto, which I was unfamiliar with until now). While I won’t tell you which is best for your use case, here’s why I preferred Arch Linux Arm:
Some names like PFSense immediately come to mind, but I’d really like to run something on Linux since I know it much better than a BSD (plus, the best [only?] OS options for the espressobin are Linux-based).
The Linux firewall landscape is pretty broad. Although we’ll almost certainly use something iptables-based, there’s plenty of higher-level services that sit atop iptables (ufw, firewalld, etc.) While you could write your own simple iptables ruleset and go with it, I opted to use a firewall service since doing so buys us some nice tribal knowledge that the Linux community has fostered over the many years they’ve managed iptables firewalls.
In general, a good firewalling daemon should:
After poking around for a while, I settled on Shorewall. Here are some of the more noteworthy reasons I went with it:
This post isn’t meant to be a comprehensive guide, but I wanted to include the broad bullet points so that it’s apparent how easy this is to put together.
This
one is easy - just follow the Arch
Linux Arm espressobin page. It’s particularly
important to note the added flags on the mkfs.ext4 command
and additional U-Boot configuration.
Generally,
Arch Linux Arm installs are pretty well set from the get-go. Of course,
you’ll want to set up a non-root user to administer with that isn’t the
default account, so remember to disable the alarm user,
change all passwords, and update the system.
As
a side note, I highly recommend installing the pacmatic package
and using it in lieu of regular pacman.
It’ll automatically detect updates to configuration files and help merge
them, as well as inline important news for breaking package changes.
In
addition, I would suggest setting up etckeeper to
track your firewall config (the
Arch wiki has a good introduction). I set mine up to automatically
push to a privately hosted gitolite repo.
To be completely honest, I dislike every config management solution out
there, and almost all of our changes are limited to /etc,
so this is good enough backup solution for me at least.
Note that the default network config for the espressobin works well for the router use case:
lan0 and lan1,
are bridged to the br0 interface.
This lets us centralize private-network-facing things like dnsmasq on a
single virtual interface.wan.
It’ll fetch its address from the upstream ISP via DHCP.The
only changes necessary to get br0 and wan setup
for our router are two additions: first, assigning the LAN interface a
static IP since it’ll be the router, and enabling IP forwarding and IP
masquerading in /etc/systemd/network/br0.network:
[Network]
Address=192.168.1.1/24
IPForward=ipv4
IPMasquerade=yes
And
confirm that the WAN-facing interface will request an address from the ISP
in /etc/systemd/network/wan.network:
[Network]
DHCP=yes
IPForward=ipv4

[DHCP]
UseDNS=no
I
set UseDNS=no here
since I prefer to use OpenNIC servers instead of my upstream ISP’s - I’ll
mention where to set these later.
The Arch Linux ARM aarch64 repositories have got the latest version of Shorewall, which is what I used. My configs aren’t that fancy, and if you’re seriously considering deploying Shorewall with a connection to the wild internet, I highly recommend reading the entirety of Shorewall’s introduction to a two-interface firewall. It covers the basics of how you should set things up with a nice summary of routing and firewalling in general.
Basically,
you’ll put the br0 and wan interface
into the right zones and set any necessary rules in /etc/shorewall/rules.
Remember to let hosts on your LAN use your DNS server:
DNS(ACCEPT) loc $FW
You’ll
confirm that DHCP is permitted on the LAN interface in the interfaces file.
I’d note here that I hit a bug with Shorewall during my firewall setup that I found to be patched literally the day before - and Arch Linux ARM had the updated package in the upstream repositories already. Score one point for using up-to-date distros.
dnsmasq is the perfect fit for a home router. It bundles together a DNS and DHCP server into a lightweight daemon that handles everything you’d need from a small network, and it’s mature enough that there’s plenty of documentation using it for that exact use case.
Note:
I attempted to use systemd’s built-in DHCP server that you can set with DHCPServer= in .network files,
since it seemed like a lightweight way to run a DHCP server without extra
software. Without being too verbose, it’s not worth it, one significant
reason being there’s no way to find current address leases.
There are lots of options that should be set here, but the most important are:
# Listen for requests on this interface
interface=br0

# Address range to draw from
dhcp-range=192.168.1.5,192.168.1.250,255.255.255.0,24h

# Default route for clients (the address we used in /etc/systemd/network/br0.network)
dhcp-option=option:router,192.168.1.1

# Instead of doling out DNS servers from your upstream ISP who may do dumb
# things for things like unresolvable names, you can rely on other DNS servers.
# These are from OpenNIC.
server=192.52.166.110
server=66.70.211.246
server=69.195.152.204
server=158.69.239.167
If you need static assignments or aliases, those are easy to add as well.
With
the espressobin serving DHCP and DNS requests on br0,
firewalling via Shorewall, and routing packets between the LAN and WAN,
it’s a functioning router. At this point, connecting the WAN port to the
ISP upstream and the two lan0/lan1 ports
to devices or another switch is all that’s necessary.
However, that’s just a start. If we really want to consider this a router replacement, there’s some genuinely cool things we can do to further beef up its capabilities so it doesn’t feel like a downgrade from something like my old Asus N66U.
I bolted on the following features to my vanilla espressobin router, which I’ll each cover in turn:
Traffic visibility is something that I found really valuable with my Asus Merlin firmware to track usage. Netflow is the de facto standard for this sort of thing, and among all the available options, I really like ipt-netflow because it’s a native kernel module so there’s very little overhead and is very actively maintained.
It turns out that I’m probably the first person to use it on the aarch64 architecture, because I got some help to get it supported on aarch64 chipset. The project’s maintainer was (and has been) super responsive to bugfixes, so I haven’t had any problems ensuring the module is supported on the latest kernels that the Arch Linux ARM project runs on.
Using
it is a matter of installing the ipt-netflow-dkms-git package
from the AUR. It’ll build for your kernel because dkms is awesome, and I
dropped the following into /etc/modules-load.d/ipt-netflow.conf
ipt_NETFLOW
That’ll
load it, and you configure it in /etc/modprobe.d/ipt-netflow.conf:
options ipt_NETFLOW destination=$ip:2055 protocol=5
Where $ip is
your netflow destination. Finally, traffic gets captured by flowing into a
special iptables target, which can be done directly from shorewall,
conveniently. In /etc/shorewall/start:
run_iptables -I INPUT -j NETFLOW
run_iptables -I FORWARD -j NETFLOW
run_iptables -I OUTPUT -j NETFLOW

return 0
This
directs all packets on the router to first enter the NETFLOW target
before anything else, which processes the packets and passes them back to
flow through the normal rules that Shorewall sets up.
Of
course, ipt-netflow needs
a place to send netflow logs to,
but that’s outside the scope of this post. In my case, I’ve got a Logstash
instance running on my network with the netflow module running
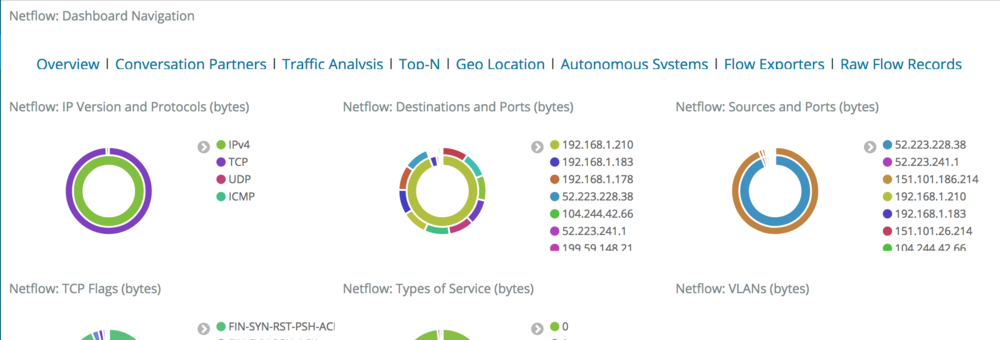
and aggregating events in an Elasticsearch cluster. This gets me some
convenient dashboards and the ability to visualize a wide variety of
information about my network. There’s some default dashboards:
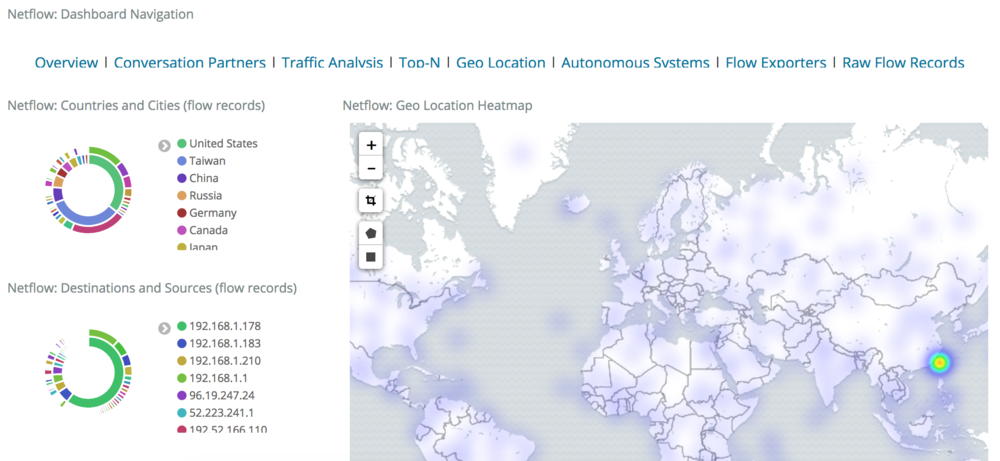
Including some pretty cool ones, like a Geo-IP dashboard:
However, the most relevant metric I’m interested in is my total bandwidth usage because I’ve got an antediluvian ISP that cares about data caps. Fortunately that’s easy with the netflow data I’m collecting: we can just ask Elasticsearch to sum some fields and get those metrics easily. The following dashboard has two visualizations:

Something particularly cool about this setup is that, because we’re storing the netflow metrics in Elasticsearch instead of some other datastore or time series database, I can actually focus the queries for these dashboards in order to do things like only sum total bytes for certain CIDR ranges because the underlying storage engine (Lucene) understands IP addresses natively. For example, the following query in Kibana:
NOT (netflow.dst_addr:"192.168.1.0/24" AND netflow.src_addr:"192.168.1.0/24")
Will effectively filter out potentially big hunks of bandwidth that happen between hosts on my LAN, such as streaming between my Kodi host and NAS machine. Cool.
This turned into a pretty massive undertaking that was a fascinating rabbit hole to disappear into. Some stock and most custom router firmwares offer some form of QoS or traffic shaping, so I was hoping to do the same on my custom router in order to protect some of my traffic (like Overwatch) from high latencies.
The world of QoS technology is a fascinating place. While you could rely on some simple schemes like an HTB (hierarchical token bucket) filter, advancements in packet filtering are surprisingly active and there are lots of interesting approaches.
What I eventually settled on was an HFSC (hierarchical fair-service curve) filter. I’ll be honest: the math behind it is so out of my league that I had to read several summaries attempting to break it down for normal people, and the best explanation that made sense to me was an excellent gist that I stumbled across from GitHub user eqhmcow that explains the benefits and use of HFSC in practice.
The tl;dr is this: with an HFSC traffic control class, you can very effectively prioritize traffic and achieve a good balance between streams that require high bandwidth and low latencies. It’s not a magic bullet – you’ll still need to mark what types of traffic are latency-sensitive – but it has worked pretty well for me. Without the rules in place, a Steam or Blizzard Launcher download will kill ping times, while active HFSC rules will gracefully trim those heavy portions of traffic to ensure interactive streams aren’t impacted. It’s really great!
The
aforementioned gist does a good job of laying out how to set up your tc classes
from scratch. However, Shorewall can actually handle classful traffic
control natively, so we can set up powerful QoS rules pretty easily. The
following config files are based upon my measured bandwidth speeds, which
are about 230 down and 10 up.
The
first step is to set the relevant tc classes
for each device in the tcdevices file:
[root@host ~]# cat /etc/shorewall/tcdevices
#INTERFACE      97%_down        90%_up          options(set hfsc)
wan             224mbit:200kb   9mbit           hfsc
br0             1000mbit:200kb  1000mbit        hfsc
Here
the LAN-facing br0 interface
gets full gigabit, but the WAN interface wan gets
97% of its down speed and 90% of my available up speed. The reasoning for
these numbers is explained
in the gist - we’re essentially recreating this
ruleset in Shorewall terms.
Next,
define how packet marks will map to tc classes
in the tcclasses file:
[root@host ~]# cat /etc/shorewall/tcclasses
#INTERFACE      MARK    RATE                    CEIL            PRIO    OPTIONS
wan:10          1       full/2:10ms:1540        full            1       tcp-ack
wan:11          3       full/2:10ms:1540        full/2          2       default

br0:20          2       full*9/10:10ms:1540     full*9/10       1       tcp-ack
br0:21          3       115mbit:10ms:1540       224mbit         2       default
This’ll
drop important/interactive traffic into classes that get higher priority.
Of course, we also need to mark the packets that should get that higher
priority, which is done in mangle:
[root@host ~]# cat /etc/shorewall/mangle
# ICMP ping
MARK(1-2)       0.0.0.0/0       0.0.0.0/0       icmp    echo-request
MARK(1-2)       0.0.0.0/0       0.0.0.0/0       icmp    echo-reply

# ssh
MARK(1-2)       0.0.0.0/0       0.0.0.0/0       tcp     ssh

# Overwatch, Hearthstone, Diablo. 3478-3497 are very general RTP ports.
MARK(1-2)       0.0.0.0/0       0.0.0.0/0       tcp,udp bnetgame,blizwow,6113
MARK(1-2)       0.0.0.0/0       0.0.0.0/0       udp     3478-3497,5060,5062,6120,6250,12000-64000

# Local traffic
MARK(1-2)       192.168.1.0/24  192.168.1.0/24
This
sets the high-priority marks (1 and 2) that get handled by our tc class.
The example includes ICMP pings, ssh, some Blizzard games, and local
traffic.
Reloading shorewall should put these into effect. The end result should permit bulk traffic such as downloads or streams while not adversely affecting interactive traffic latency like ssh, in-game ping times, and so on. My informal tests have confirmed this - note that if you decide to verify this yourself, you may observe latency spikes immediately following an initial burst of bulk traffic, but HFSC steps in quickly to enforce limits to keep latencies low for interactive traffic.
I have a couple sets of benchmarks that show HFSC in action, but here’s a tiny example: how ping latency are impacted when iperf is run in the background.

As you can see, without any traffic control rules in place, bursts of bulk traffic can have pretty negative impacts on interactive traffic sensitive to high latencies. With HFSC, we can avoid those problems.
I’ve
been using my home-brew router for several months now and it seems to work
great. I haven’t experienced any mysterious connection drops, speed
issues, or hardware problems over the entire period of continuous
operation, so I’d consider the build a success. Upgrades are fine as well;
after a normal sudo
pacmatic -Syu and reboot the system comes back
online with all the iptables rules and other services as expected, so
keeping up with the latest kernels and other packages is straightforward.
To summarize:
This post is already too long, so I’ll close here. If you have comments or questions, please do leave one via the Discourse thread attached to the bottom of this post.